


Your Cart is Empty
-
 |
|  |
| 
So you’ve done it, committed to becoming a serious cyclist. You’re ready to clip into your bike and enjoy all the extra power transfer and efficiency of riding clipless. Let's set up your pedals and your shoes.
There are basically four steps to get you going in the right direction. 1. Remove your current Pedals. 2. Install your NEW pedals. 3. Install your Shoe's cleats. 4. Test and tighten!!! Here's a quick 1min video to get you started.
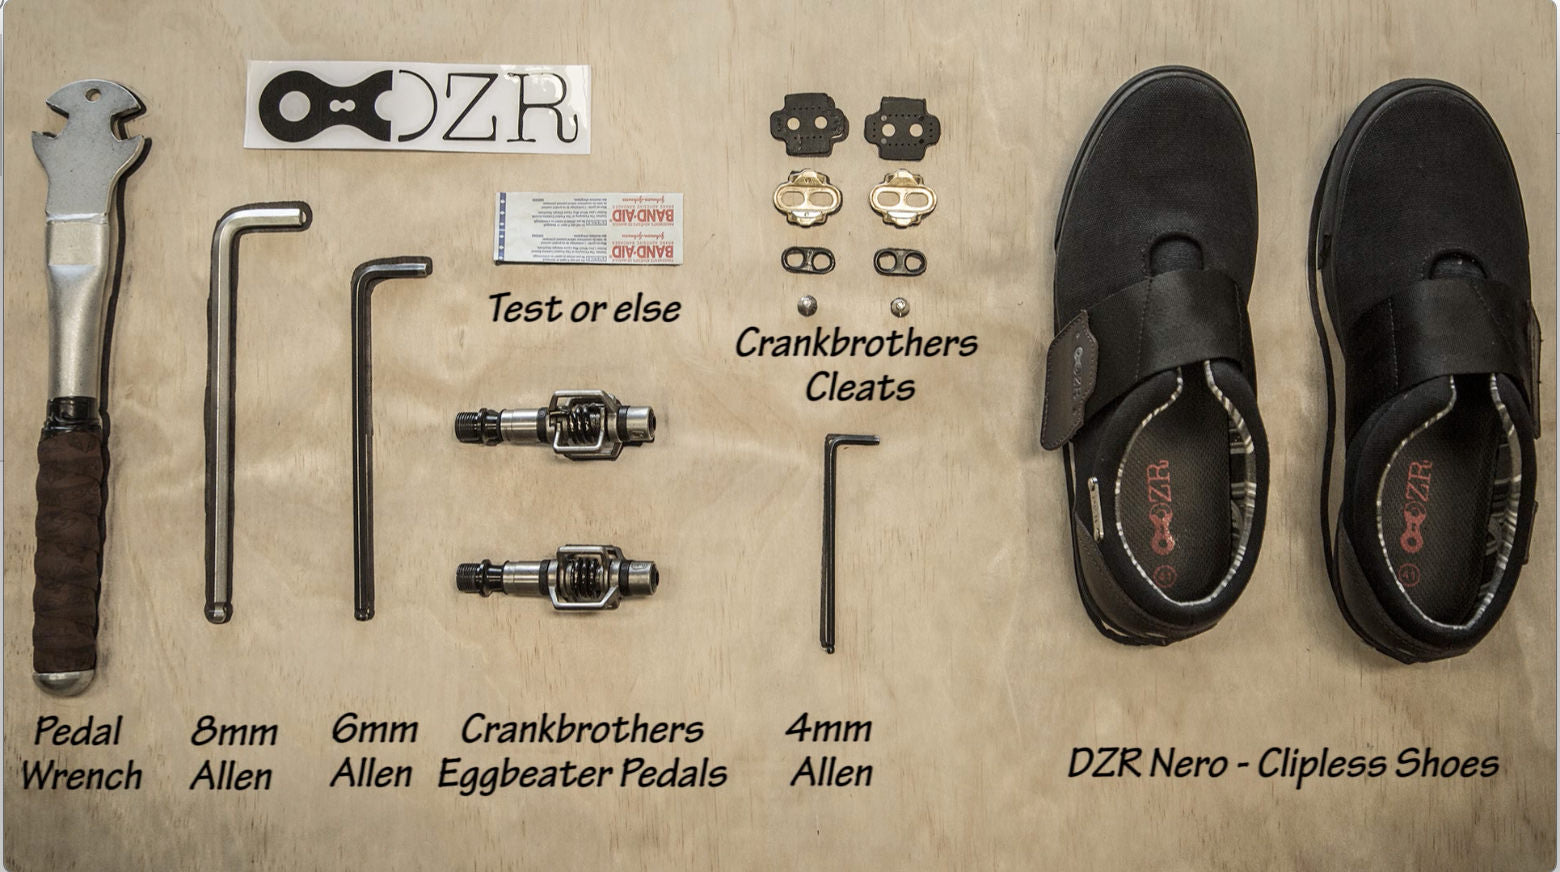
You'll need 3 basic tools:
1. 8mm Allen wrench (some pedals need 6mm)
2. 4mm Allen wrench (common one in Ikea assembly tools)
3. 15mm (9/16”) wrench
Step 1: Remove your pedals.
Most likely if you’re using a flat pedal, you'll only need the standard 15mm wrench. However, on some occasions, such as high-performance flats, are attached with an 8mm Allen wrench. To remove the old pedal, use the 15mm wrench. Place the wrench at the connection point to the crank. I find you can get better leverage when you place the pedal in the downward position. If you’re removing the right pedal, you want to turn counter-clockwise. If you’re removing the left pedal, you will turn clockwise. The reason for the opposing threads is so that you will continue to tighten your attachment as you pedal around town. A pretty ingenious method design to make sure that your pedals never loosen and fall off.

Now, sometimes if your pedals have been on your bike for a long time and they’ve developed rust within the threads it will make it almost impossible to remove the pedal on your own. You'll need extremely robust tools and stands like those of a bike mechanic. If this is the case run down to your local bike shop and they’ll easily take off your pedals for you. It’s better than breaking a wrench or finger in the spokes while throwing all your weight into it.
Step 2: Install your NEW pedals
Whether you're using Shimano, Crankbrothers, or Time Pedals, it’s all about the same setup. Simply identify your Left vs Right pedal and thread them into the reciprocating crank. The Right pedal will thread clockwise, and the Left pedal will thread counter-clockwise. Then use your large (6mm) Allen wrench and from the inside of your crank arm, tighten your pedal onto the crank. You don’t need to over tighten, as we mentioned before the stroke of your pedal will actually further secure your new pedal.

Step 3: Install the cleats onto your shoes.
Finally, get ready to place your cleats on your shoes. Go ahead and use the small (4mm) Allen wrench to remove the rubber plug covering your cleat window. Next grab your cleats, cleat washer, the screws that come with your pedals, and any shims that come with your cleats. So, you may ask, do I need the shims or can I just attach the cleats directly. Well, compared to Shimano’s, Crankbother and Time cleats are thinner so those cleats may need the shims to raise them to the same height as the rubber outsole. If you do not use the shims and allow the cleat to sit too deeply in the window, you may find that your shoes will not disengage when you twist, ending with you stuck on your pedals when you want out.

So now stack (the shim, if needed) your cleats and then the washer on top. Line up the bolts through the stack of parts and thread each bolt into the cleat nut. Keep the bolts loosely threaded so that the assembly can slide up and down and side to side. This next step actually has some personal preference for it. Some people prefer the cleats to be further forward, under their toes and some people prefer them to be back closer to the middle of their foot. If you prefer your cleats to be forward under your toes choose the upper threads. However, if you prefer your cleats to be more in the middle of your foot then choose the lower threads.

Once you are satisfied with the position on your shoe, tighten your bolts with the small (4mm) Allen wrench; make sure you tighten well, as you do not want your cleats to move at all otherwise you will not be able to unclip. And you’re done!

Step 4: Test and test again
Now is the moment of truth, the most important step is to test your assembly. Lean near a wall or seat for support then get on your bike. Clip in by pointing your toe and engaging the front of your cleat with your pedal then step your heel down. To disengage twist your heel out from the bike until you feel the release from the pedal. Begin testing each foot clipping in and clipping out. Try this several times with both feet.
If your assembly feels secure go ahead while holding support and engage both feet at the same time. Step in and twist out both feet repeatedly. Your goal is to develop muscle memory to disengage by twisting off the pedal not pulling up or sliding forward.
Now after a day of riding, you find that you are constantly having trouble clipping in, then it might be because your cleats are not where you would normally engage with the pedal. If this should happen, take your shoes and loosen the bolts on the cleat only enough to slide the assembly up or down. Then adjust your position according to your natural foot placement.

Two tips before you head out, 1. check the screws on your cleats one last time to make sure they are securing the assembly tightly against the shoe. And 2. while you’re riding, practice disengaging and re-engaging while you’re still moving, ensure a lot of runway. When you approach a stop sign or stop light disengage far in advance. Enough in advance that you could actually turn around if your feet are stuck.
And finally, if you do fall over, don’t feel bad just about every one of us has done that when we started out clipless. The worst part is that it usually happens after we roll up at a stoplight smiling, grinning from ear to ear in front of a car full of onlookers, when we come to the realization that our feet are stuck and we begin to panic, wiggle, violently jerk while in a slow embarrassing timber. But ultimately using clipless is a whole new world of biking, and well worth the trouble. Enjoy the ride!
